- General Troubleshooting Guide
- QuickBooks Desktop Error Messages
-
Connex Ecommerce User Guide
- Getting Started with Connex Ecommerce
- Remote Desktop (RDP)
- Customers Matching
- Inventory Site
- Inventory Sync
- Multicurrency
- Orders
- Price Levels
- Products
- Refunds
- Sales Tax
- Sales Orders
- Unit of Measure
- Web Connector
- Getting Started with Rules
- Rules Engine Common Rules
- FAQ
- Deposit Match
- Cost of Goods Sold
- Troubleshooting
- Custom Store
- Billing
-
Connex Ecommerce Analytics
-
Frequently Asked Questions
-
General Troubleshooting Guide
- Deposit Match Troubleshooting
- QuickBooks Desktop Error Messages
- Inventory Troubleshooting
- Incorrect Orders Troubleshooting
- Sales Tax Troubleshooting
- Web Connector Troubleshooting
- QuickBooks Online Error Messages
- Match Deposit Tool Troubleshooting
- Product Matching Troubleshooting
- Customer Matching Troubleshooting
- Rules Engine
- Orders from QuickBooks
- Payments Troubleshooting
- Company File
-
Connex Ecommerce Integrations Guide
- Acumatica
- Amazon
- Amazon Settlement Report
- Bigcommerce
- CIN 7
- ERPAG
- FreeAgent
- Freshbooks
- Hubspot
- Keap
- Launchpad
- Magento 2
- Microsoft Dynamics 365
- Netsuite
- Odoo
- Paytrace
- Salesforce
- ShipBob
- ShipRush
- ShipStation to QuickBooks
- From QuickBooks to ShipStation
- Sage Business Cloud Accounting
- Sage Intacct
- ShipHero
- ShipWorks
- Shopify
- Square
- Stripe
- Veeqo
- Walmart
- WooCommerce
- Xero
- Zoho Books
- SPS Commerce
-
Rules Engine Guide
An attempt was made to modify a SalesReceipt with a date that is on or before the closing date of the company.
How to troubleshoot closing date errors.
Problem
You have told QuickBooks to exclude orders prior to a certain date.
Solution
If you have access to preferences:
- Choose Company > Preferences.
- On the side menu, click Company and then Closing the Books.
- To disable closing the books, click to clear the Closing the Books checkbox.
- If you want to change the date where you want to stop changes from happening, adjust this information within the Closing date box.
- You also have the option to choose a Closing date warning type:
- Only warn - a warning message will appear but the user can click Yes to save changes anyway.
- Warn and require password - the warning will come up requiring the password. Without the password changes can't be made.
- You can also change the password by overwriting what is currently listed within the Password and Confirm password boxes, which need to be identical in order to save.
- Click Save.
Solution 2
Here are the steps:
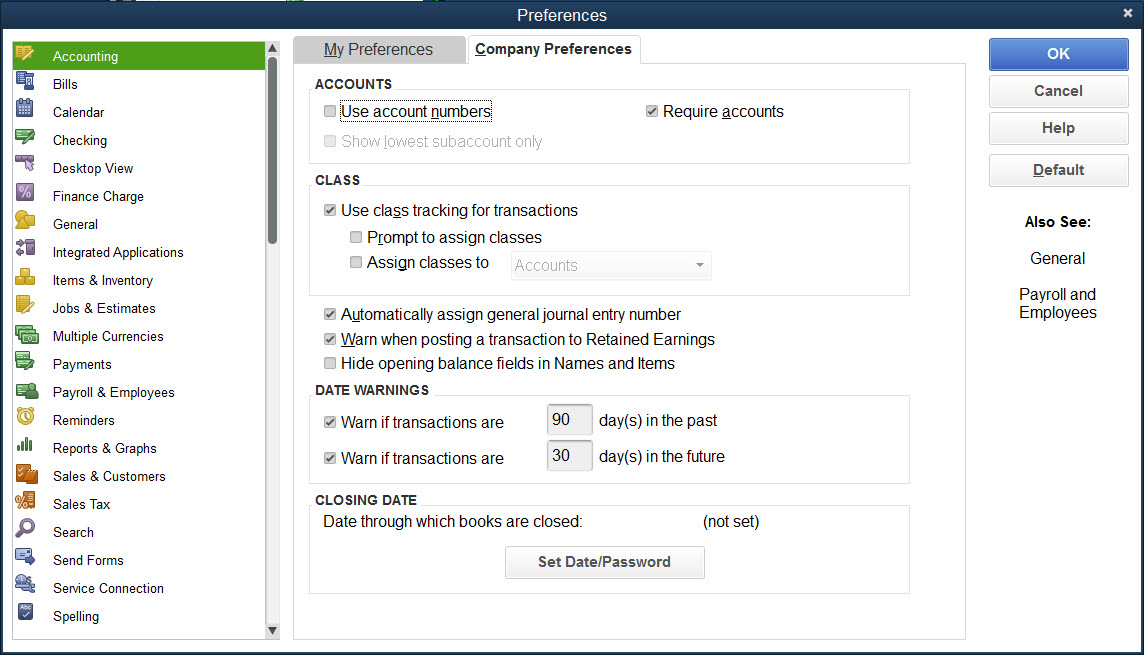
- In QuickBooks, go to edit > preferences and click Accounting.
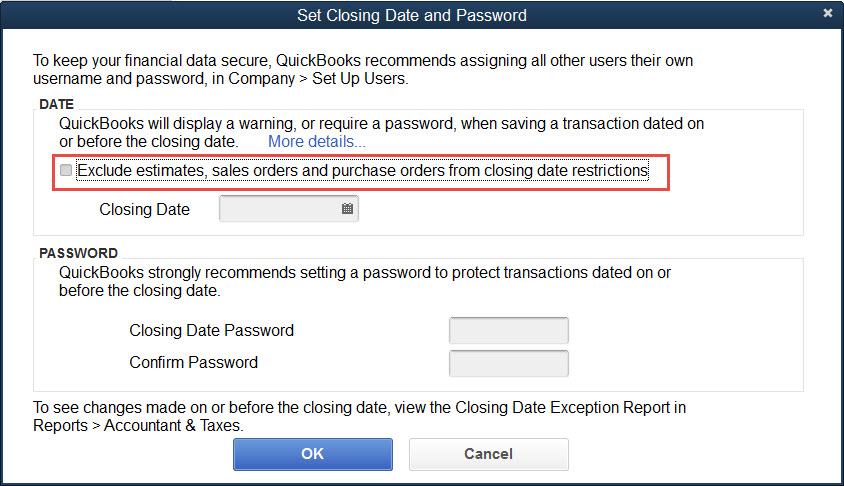
- Under closing date, click set date/password:

- Uncheck the exclude estimates:

- Click OK.
