Is there a demo?
Here is a video:
Prerequisites
Before getting started with QuickBooks Enterprise, there are a few important prerequisites:
- Chart of Accounts - QuickBooks Chart of Accounts must be fully built
- Item List – Your products should already exist in QuickBooks and on your website.
- Product Matching – Each item on your website needs a unique SKU. This SKU needs to match a field in QuickBooks, exactly.
- Sales Tax - If you use QuickBooks tax codes, the codes should exist prior to getting started.
- Access – You need ADMIN access to QuickBooks and your website. To link your selling channel with QuickBooks, you must login to QuickBooks as the ADMIN in Single User Mode.
- Web Connector – If the web connector is not already pre-installed, its needs to be installed on your machine before you can connect your selling channel.
See below for additional details on the above prerequisites.
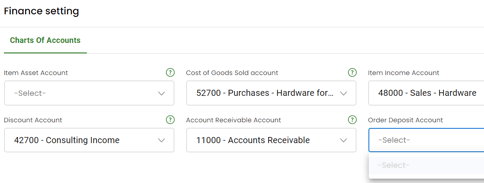
Chart of Accounts
Your chart of accounts must be fully built out and contain at least one of the following account types:
- Accounts receivable - (A/R) account
- Item asset account
- Item income account
- Cost of goods sold - (COGS) account
- Discount/refunds given account
- Undeposited funds
Item Asset and COGS are not required, unless you asked Connex to make inventory parts. Accounts Receivable is required for invoices only. Item income and discount are required because Connex makes shipping and discount items in QuickBooks.
How do I adjust the chart of accounts for QuickBooks Enterprise?
If you already installed Connex and visited the finance settings page, all drop downs should have a selection.
If accounts are blank, then you must create them:
Order Deposit Account
This account is almost always undeposited funds. Here are the steps:
- Go to customers on the top menu and click customer center.
- Create a customer, if none exist.
- On top, create a new invoice.
- Enter in a product.
- Click the button to create a payment for the invoice and save all transactions.
- Press CTRL + A.
- Search for undeposited funds.
Item Income and Discount Accounts
Go to finance settings. QuickBooks should include these accounts. If not, here are the steps:
- Press CTRL + A.
- Click new on the bottom.
- Choose income account as the type.
- Enter sales.
- Click save.
Accounts Receivable
Go to finance settings. QuickBooks should include this accounts. If not, here are the steps:
- Press CTRL + A.
- Click new on the bottom.
- Choose A/R account as the type.
- Enter Accounts Receivable.
- Click save.
Once complete, click Connex setting and update drop down list. Follow the on-screen instructions and return to the accounts page.
Item List
Your QuickBooks item list and e-commerce product list should match, prior to getting started with Connex Desktop. The majority of your products should already exist in both places.
Product Matching
Each product on your website needs a unique SKU. The SKU should be an exact match, case insensitive, between QuickBooks and the website. For more information about product matching, please see:
Customer Matching
Connex will match customer records using the QuickBooks customer name field. To learn more about how this works, please see:
Sales Tax
If your organization uses QuickBooks tax codes, these codes should exist in QuickBooks prior to getting started. To learn more about how Connex maps QuickBooks Sales Tax codes, please see:
Access
You will need admin access to QuickBooks and the supported platforms that you wish to integrate with Connex.
Before you can link your selling channel and QuickBooks, you must login to QuickBooks as ADMIN, and enable QuickBooks to run in Single-User Mode. This will allow you to pair QuickBooks to your website, and allow you to make certain changes to QuickBooks.