How do I use the "next available number" in QuickBooks?
This article details how to take advantage of native QuickBooks order numbering (called "next available number") instead of the integration order number.
How does Connex map order numbers in QuickBooks?
By default, Connex will insert the integration order number as the sales order, sales receipt, or invoice number. Alternatively, QuickBooks offers a native transaction number features that uses the last order number plus one as the order number. You can instruct Connex to use this numbering scheme.
Note: This feature requires Connex to place the eCommerce order number in the Memo field. If you modify the memo at any point, this could lead to order duplicates!
Why would I use this setting?
The setting is ideal if:
- You have several selling channels.
- You have multiple channels of the same integration (i.e. two different Shopify stores where the numbers can intersect)
- You do not wish to use an order prefix (i.e. SH-1000 instead of #1000)
- You have a large company file that goes back many years, where you unknowingly collide with old orders (i.e. order #123 from 2015, preventing order #123 created today in ShipStation)
How does Connex for QuickBooks find duplicates?
When Connex syncs a new order, Connex inserts the order number into the QuickBooks memo field. Connex will match the order date and the memo.
How many digits can Order Numbers be?
- QuickBooks Desktop order numbers can be a maximum of 11 characters
- QuickBooks Online order numbers can be a maximum of 25 characters
How do I enable QuickBooks numbering?
QuickBooks Online
In QuickBooks Online (QBO), invoice (or sales form) numbers are automatically generated in sequence by default. You can change or turn off automatic numbering if you want to manually set them. Here’s how:
To Change Automatic Numbering:
-
Go to Settings (⚙️ gear icon in the top right).
-
Under Your Company, select Account and settings.
-
In the left menu, choose Sales.
-
Find the Sales form content section and click ✏️ Edit.
-
Check the box for Custom transaction numbers.
-
This lets you edit invoice, estimate, sales receipt, or credit memo numbers manually.
-
Once enabled, you can set your own numbering sequence. QBO will then continue numbering sequentially from the last number you enter.
-
-
Click Save, then Done.
To Update the Next Number:
-
Create a new invoice (or other sales form).
-
In the Invoice no. field, type the number you want to start with.
-
Save the invoice.
-
QBO will continue with the next number in sequence from that point forward.
-
⚠️ Note:
-
If you leave automatic numbering on (without custom transaction numbers), QBO sets the sequence automatically and you can’t change it.
-
If you turn on Custom transaction numbers, you’ll need to make sure you don’t accidentally duplicate numbers—QBO won’t warn you.
How do I change the next number going forwards in QuickBooks Online?
Here are the steps:
-
Go to + New ➝ select Invoice (or the form you use most).
-
In the top-right of the invoice form, find the field labeled Invoice no. (or Estimate no., Sales Receipt no., etc.).
-
Type in the number you want as the new starting point (e.g.,
5000). -
Save the invoice.
👉 From now on, QuickBooks will continue numbering sequentially from that number (5001, 5002, 5003…).
How do I Restart Invoice (or Sales Form) Numbers?
-
Enable custom transaction numbers (if not already on):
-
⚙️ Settings → Account and settings.
-
Go to Sales → Sales form content → click ✏️ Edit.
-
Check Custom transaction numbers.
-
Click Save, then Done.
-
-
Set your new starting number:
-
Go to + New → Invoice.
-
In the Invoice no. field, type the new starting number you want (e.g.,
1or1000). -
Save the invoice.
-
-
QBO auto-continues from there:
-
If you set the first invoice as
1, the next one will be2, then3, and so on. -
If you set it as
1000, the next will be1001,1002, etc.
-
Connex
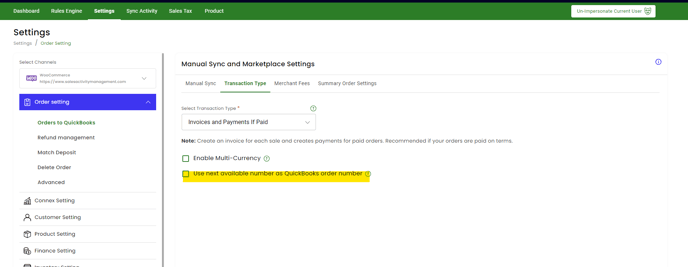
You must configure Connex to use the next number:

- Login to Connex for QuickBooks.
- Click Settings
- Select channel
- Click Order Setting
- Click orders to QuickBooks
- Click Transaction type tab
- Checkmark the setting "Use next available number as QuickBooks order number"
Why is Connex is inserting orders without numbers?
QuickBooks Desktop
You created an order in QuickBooks without a number. Create a new order in QuickBooks. Give it a number. Next time, QuickBooks will add one to the numbers.
QuickBooks Online
QuickBooks will add one to the last number. If your latest order has no number, QuickBooks will show blank order numbers. You must add an order and QuickBooks will add one to the next number:
- In QuickBooks, click on the gear.
- On the left, select company settings.
- On the left of the next screen, click sales.
- Under sales form content, check custom transaction numbers.
- In QuickBooks, go to customers and add a new invoice.
- Make the invoice number 1000.
- Go back to the sales form entry page.
- Uncheck custom transaction numbers.
- QuickBooks will start at 1001.
![Connex_Logo_HelpCenter_100h.png]](https://help.connexecommerce.com/hs-fs/hubfs/Connex_Logo_HelpCenter_100h.png?height=50&name=Connex_Logo_HelpCenter_100h.png)